
Dear Friend of Half-Acre Homestead,
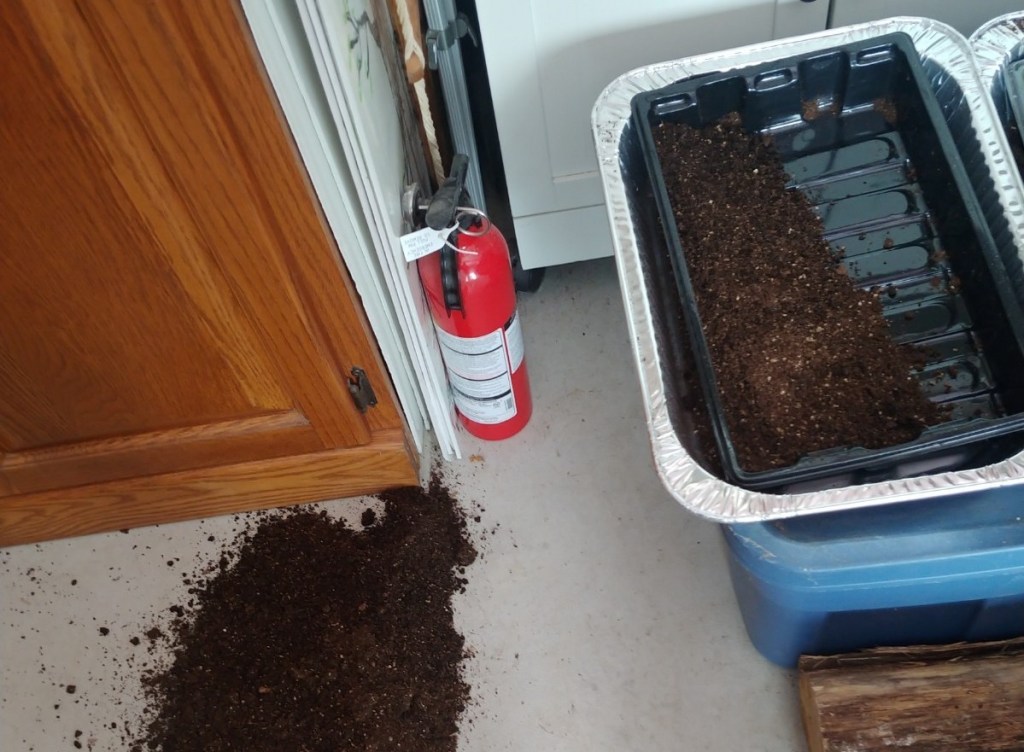
This is the first week that there has been a hint of spring in the air here in Eastern Ontario, Canada. However, as you may know if you have been reading my earlier blog posts, I have been at my seed starting for over a month now. As you can see in the photo, I have faced some difficult challenges already. I thought it might be helpful to share where I’m at with my seed starting, and my few “disasters” I have already been challenged to overcome. Were they really “disasters” though? You will have to read to the end to find out!!!
A Special Note: A lot of the content in this post is about more advanced seed starting techniques and ideas. If you are new to seed starting, you may read this blog post and find it hard to know where to start. I will write some ideas at the end of this post just for you.
1) My Beloved Bunching Onions on the Floor!
I still actually don’t know how this happened! I was climbing a step ladder to get one of my grow lights off the top of my armoire. As I stepped down the ladder, I somehow upended my full tray of bunching onions, which I had planted two weeks earlier. I heard a noise….when I turned around, my flat of onions was on the floor! I was devastated! Even worse, as I inspected the grow medium, I saw a few seedlings that had already germinated. What had I done? (I have to admit this is pretty embarrassing to share, but I hope that I can prevent a similar disaster by sharing my own.) As I looked through the mess on the floor, I came to the conclusion that there was nothing else to do but sweep it up (sigh) and replant. I did this right away and then just did my best to let it go and keep moving with my seed starting efforts.
2) Early Peppers Overcome with Insects
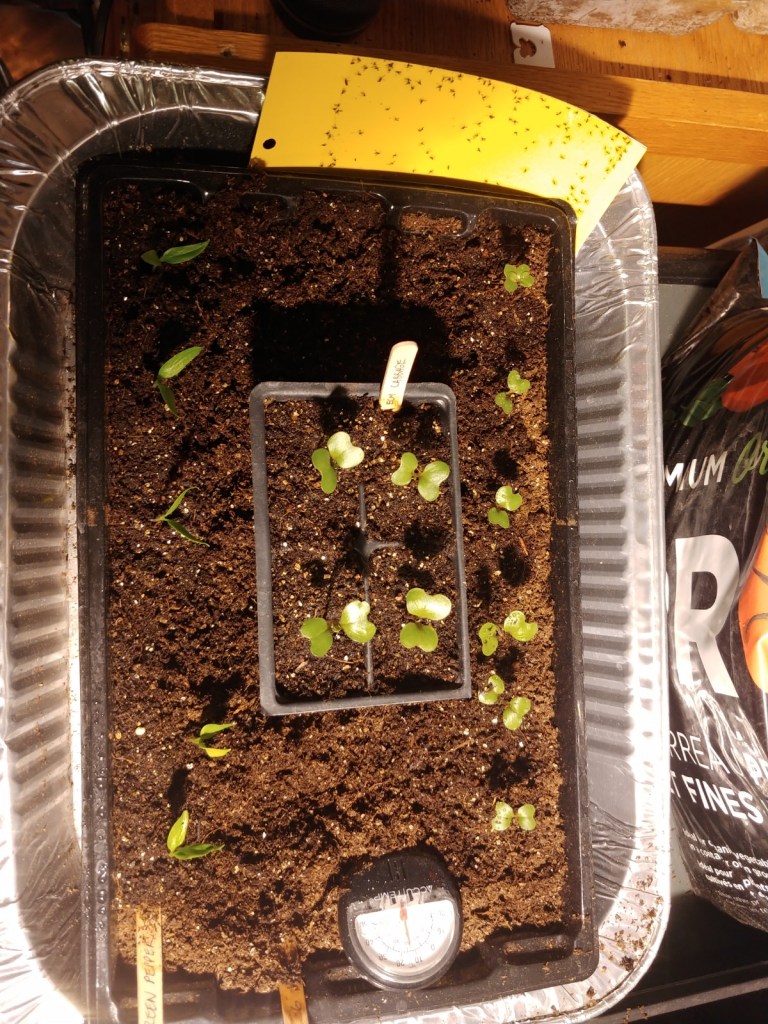
When people ask me how much time it takes to start seedlings, that is a difficult question to answer. It doesn’t really take a ton of time at once, but it does take little bits of time quite often. For example, I do a close check of all my seedlings daily. I take a few minutes to peer closely at them, not just from a distance. They always look pretty good from a distance! One evening, I did my close check of my pepper seedlings (both green and hot). I was shocked! There were little tiny bugs on all of them! ARGH!
I began the process of picking them off and crushing them. There were too many to pick them off, honestly! There was at least one little bug on the underside of every single leaf and some on the stems, too. I thought I could see that they were trying to eat the emerging set of true leaves from the pepper seedlings. This would surely kill them. I pulled the flat off the table and picked and crushed as best I could. It appeared that these bugs were the offspring of the black flies that were hanging around. I had bought an aphid control sticky sheet from a local hardware store not too long ago, as I know these flies often hang around while seedlings emerge and the growing medium is damp.
I set the yellow sticky sheet on the edge of the flat. I went back several times over the next 24 hours to crush all the bugs I could. It appeared to calm down and the seedlings seemed OK. The sticky sheet started to catch huge numbers of these flies. As these bugs are now under control, I plan to buy enough of these sheets (they are only around a dollar each) for each seedling flat. Here’s a photo of how many flies got stuck on the sheet.
The photo below shows my first flat as it is partially transplanted. Only a row of early cabbage and my green peppers remains. For comparison, I placed a four pack of early cabbage seedlings that were started in the same growing medium, but placed in a different location. I was quite pleased with the root development of this four pack of seedlings! Notice, too that there is a thermometer on the surface of the soil. I like to monitor the temperature of the soil and the seedlings. I bought a few of these at a local hardware store. Some seedlings, particularly peppers, like warmer temperatures to germinate. However, most seedlings like cooler temperatures to grow. These little thermometers are great to have around!
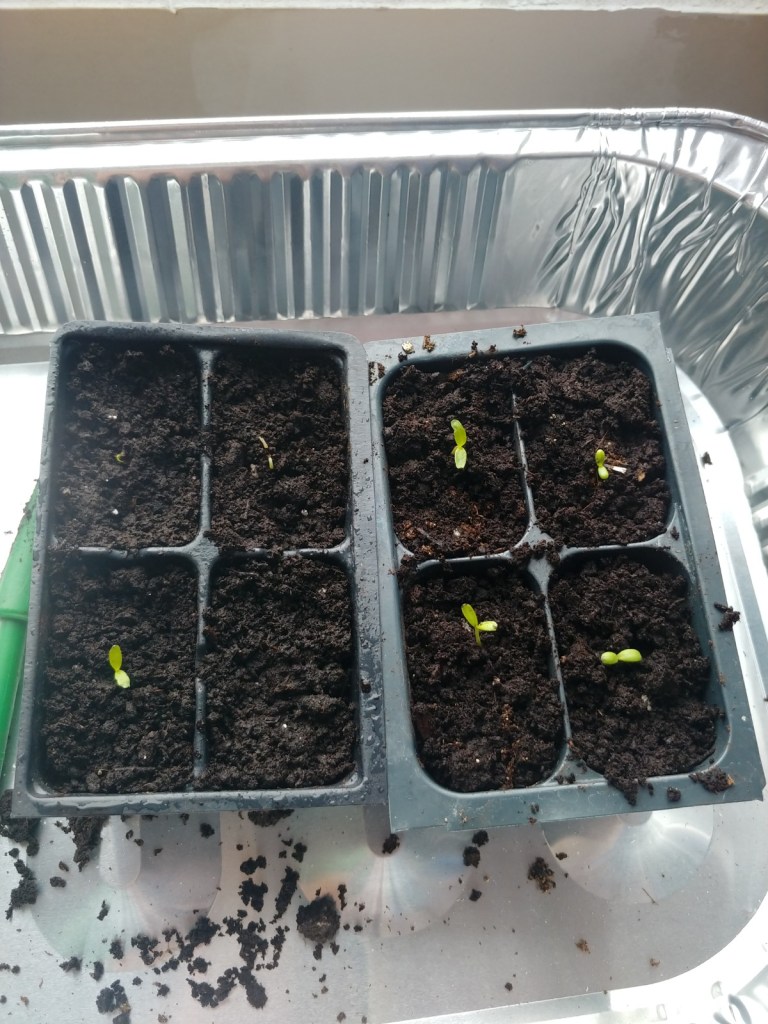
Here is a photo of my two flats of onions, taken around three weeks after I replanted the bunching onions. The intact onions, which are sweet Spanish white are on the left, the replanted flat of bunching onions is on the right. This also gives you a good view of my set up. I take advantage of the daytime sun for these seedlings, and then run my grow lights in the evening, all hours that I am awake. An aluminum tray makes an excellent light reflector and isn’t very hard to install on the head of the lamp. My grow lights are inexpensive LED bulbs that screw into a standard lamp. These onion seedlings can be trimmed back to 6 inches high if they get too long waiting to be planted.
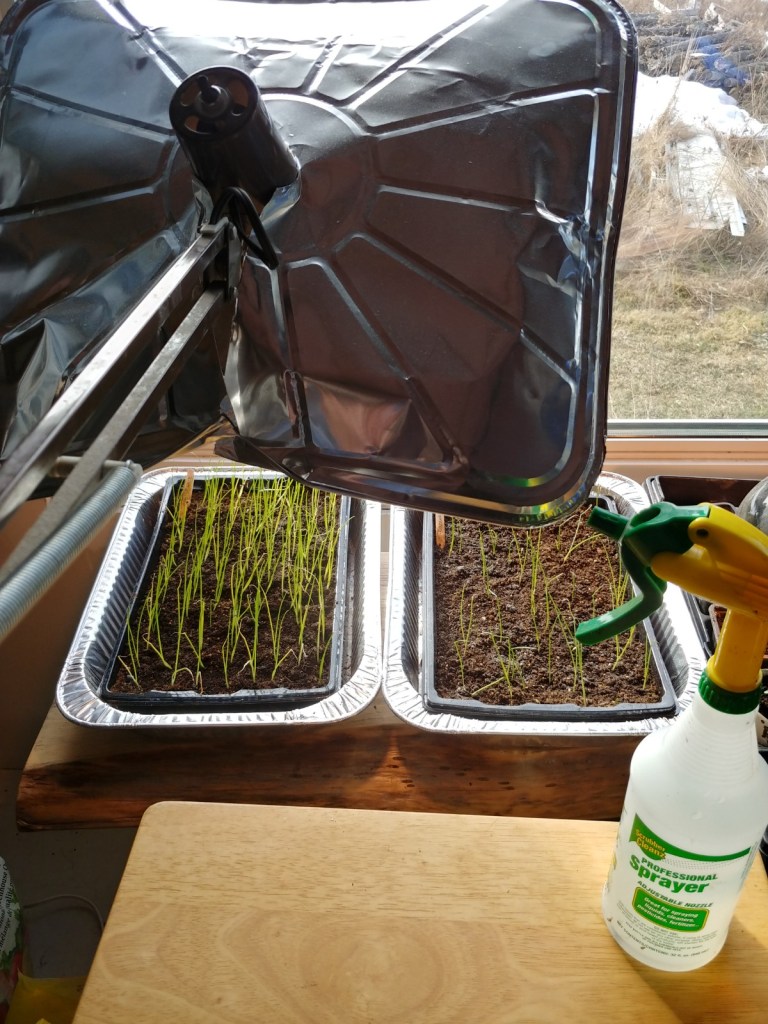
Notice that the growing flats are in roasting pans. I drilled very small holes in these black plastic growing flats, around 9 holes evenly spaced. I place them in the roasting pans, which have no holes. This makes it very easy for me to water from below, which some say is better for the seedlings. The water goes where it is needed, to the roots. I am surprised how quickly a cup to a cup and half of water is picked up by the growing medium and even makes it way to the top. If I am concerned that seedlings are getting overly dry (not very common), then I gently mist the soil surface, not the seedling itself. Most of the misting I do is prior to germination, before any part of the seedling emerges. That is when the dampness helps. But not TOO damp, or the seedlings will rot and die off.
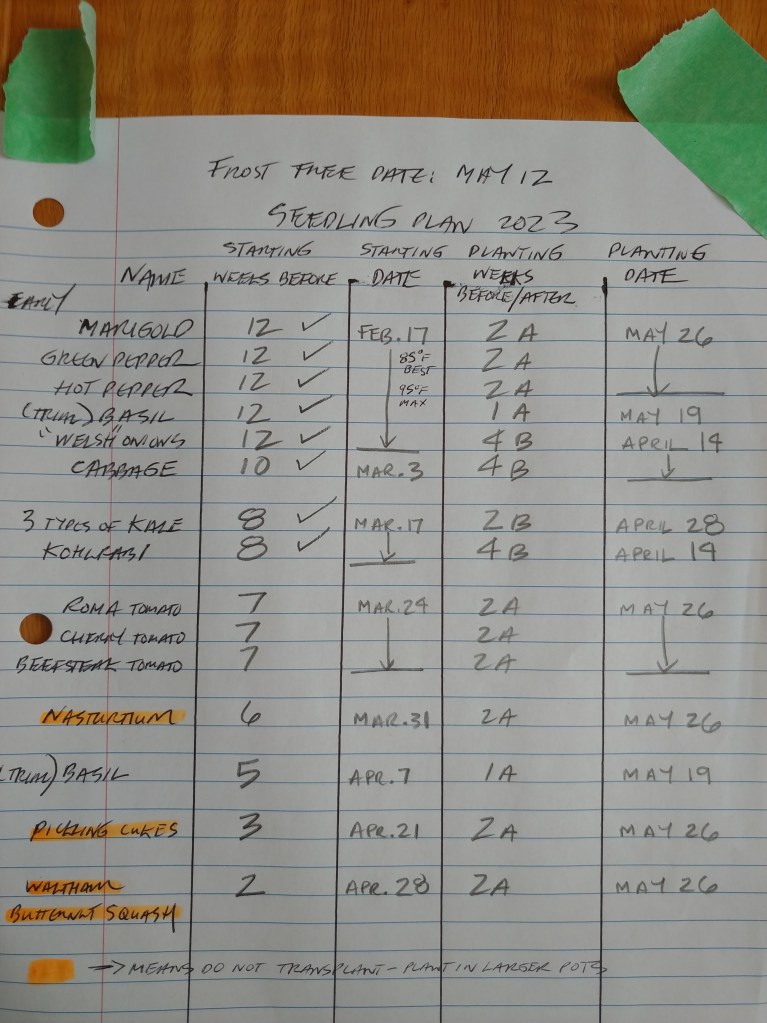
So far, I have successfully kept to my planting schedule, which I have taped to my cupboard door in the eco-cabin. I am due to plant my tomatoes on Friday. I will plant three different types.
Here is an image of my planting schedule and what I have checked off so far, The plants with the orange highlighting are ones that are not improved by transplanting early. They are the only ones that I will plant in larger pots to germinate and grow in one pot before they move outside to the garden:
3) Marigold Seedlings Start to Die!
Marigold seeds are generally very quick to germinate, and mine were nice and quick, the first seeds to germinate this year. However, soon after they emerged, they began to fail. Their heads fell off. They were not thriving. I really didn’t know what was happening, but I knew if I left them there that they were not likely to make it. They did not have their first true leaves yet, but I decided to transplant them all early into the organic soil. This saved the seedlings, I am sure. Here is a photo of the seedlings right after I transplanted them into some four packs I had:
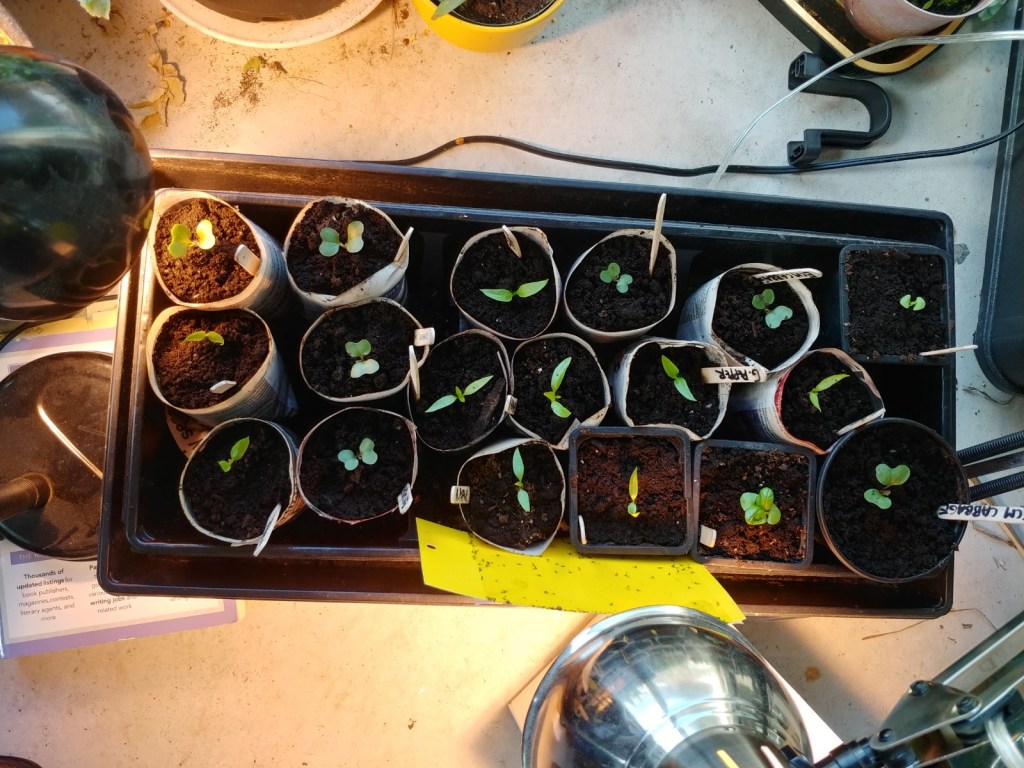
Here is a photo of one “area” of my seedlings. All of these have already undergone transplantation. You can see the Marigold seedlings, with their red stems and multiple leaflets, are now doing fine. This is a good example of just trying something, even when you’re not sure what is going on. Interestingly, the aphid bugs didn’t go near the marigold seedlings, even though they could have. The Marigolds kept their reputation as a good companion plant, I think! The two cabbage seedlings at the bottom left hand corner are two extras that I didn’t have the heart to cull. I tried to give them away today, but my friend didn’t want them. I will try to find them a home, but I am soon going to be running out of space once the tomatoes germinate and are transplanted.

Here is a photo of my other flat of transplants. It currently sits on the floor with two grow lights on it: These are a mixture of Genovese Basil, Hot and Green Peppers, Early Copenhagen Market Cabbage. You will notice that I am making a lot of my own transplant pots out of newspaper (the round ones). This is a trial of these. The reason I like the idea of them is that they provide much more space for root development than a standard four pack. I will keep you posted on how these work out!
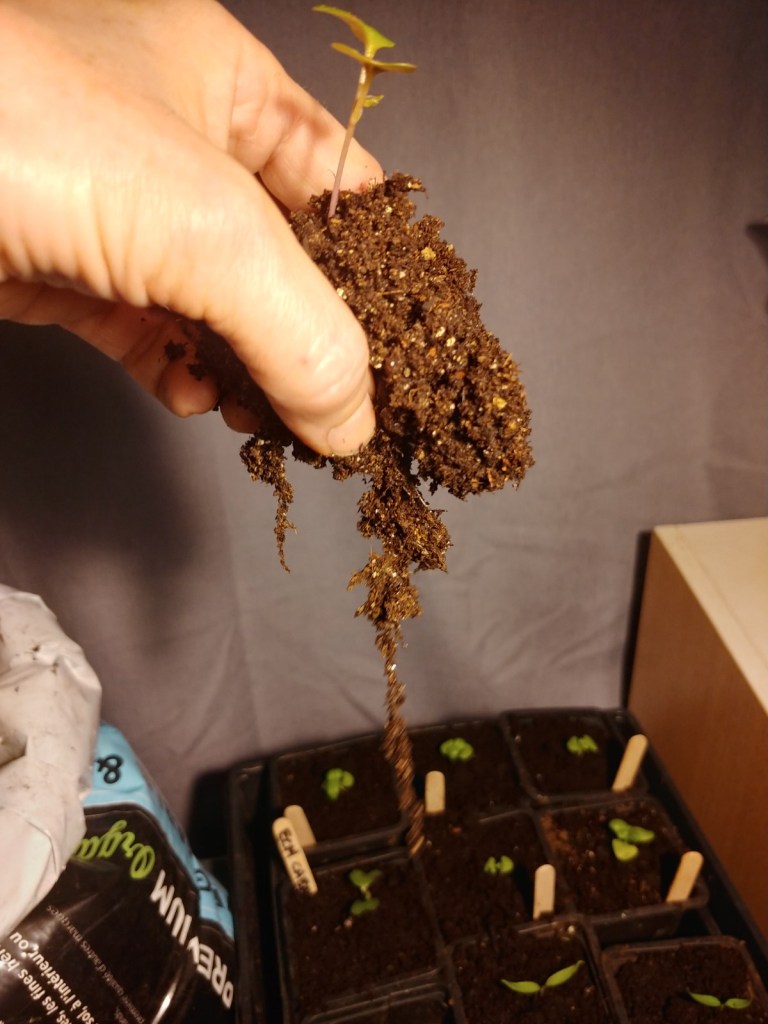
What has gone well? Overall, the seedlings have been thriving in the growing medium. How do I know this? One way that I can tell is when I go to transplant them. The root systems that they are developing are quite extensive. Keep in mind, that the growing medium has absolutely NO fertilizer in it! The organic soil that I transplant them into does have organic slow release fertilizer. Here’s a couple of photos of the root systems of the seedlings. Here is a cabbage seedling started in the flat. Look at those roots!:
That’s about all I have to share in terms of seedlings, but I thought you might enjoy a photo of something fun I tried today: making my own crackers! I hand ground most of the flour myself this morning from organic spelt kernels I buy from a local farmer. I added a bit of regular, all-purpose flour, some baking powder, salt, and olive oil and a bit of water and voila! delicious crackers. I found that the secret is to make sure they are well-browned. I like them crunchy!
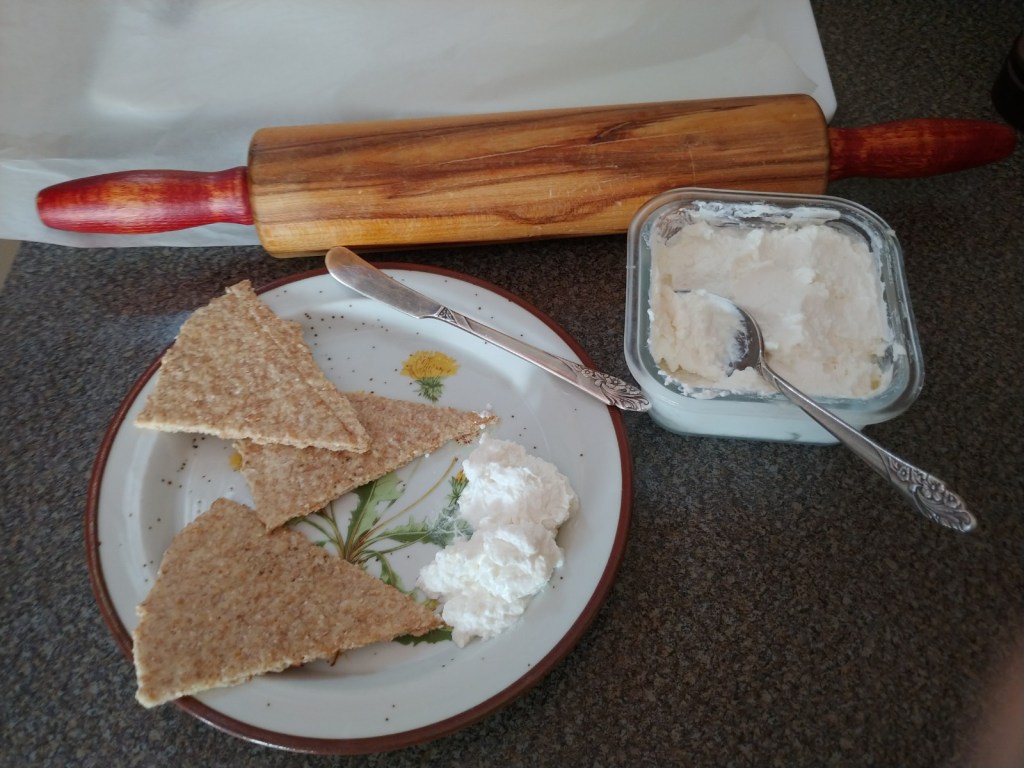
I had them with some of my homemade kefir cheese. It was a great snack!
For beginning seed starters, here are some ideas:
-Pick just one or two vegetables to start with, such as tomatoes and kale. Maybe you could pair up with a friend and each do two different ones and exchange.
-When I first began starting seeds, I used the peat pods. They can be quite good, and are often available in a mini-green house with a clear lid for 12 peat pods. Plant two seeds per peat pod and trim back the weaker one. Don’t pull it out! That could harm the stronger one! One 12 peat pod tray with a clear lid would probably be enough for a first season with plenty to share with a friend.
-Don’t over water your seeds and peat pods! This is a common beginner error and leads to death (damping off).
– One LED grow light bulb and a desk lap that adjusts in height would be enough for 12 seedlings. Put the light on the moment the seedlings emerge, within a few inches of them. This will prevent them getting long and spindly. Turn it off when you sleep. The seedlings need their rest, too!
-Once the first true leaves emerge, gently transplant from the peat pods to a good organic soil. If the organic soil does not have slow release fertilizer, then use a fish emulsion fertilizer mixed in with water once every two weeks or so.
-Good luck getting (seed) started! Let me know how it goes by email. I’d love to see a photo and hear from you.
Before I go, I want to come back to the title of this blog post, “My Seed Starting Disasters and How I Overcame Them.” Were these really disasters? No! I guess the worst one was my bunching onions on the floor: that was just an absent-minded mistake I made. I chose this title intentionally to raise this issue in the post.
One of the things I hope that I am able to share through my blog posts is about the nature of gardening: Stuff Happens! Sometimes I am able to clearly identify the problem (there are cabbage moth eggs on my kale) and what to do (pick, spray with organic soapy water, pick and spray again).
And sometimes, like the situation with the Marigold seedlings, I really am NOT sure what’s happening and what to do. So, I just try something. This time it worked, but sometimes it won’t. That is the true nature of gardening… a lifelong experiment where every growing season is different. What I have found is most helpful along with way on this journey is taking a positive attitude and being kind to myself as I grow my garden and my knowledge.
With the gardening season fast approaching, this might be a good time to sit down and ask yourself these questions:
What are my top three goals for this gardening season in terms of what I grow? (It could be expanding your variety, growing something more difficult, learning more about composting, involving your children more in the process, etc. etc.)
What are my top three goals for how I APPROACH gardening this season? (could be to be more patient with your learning curve, be willing to ask for help when you need it, limit critical self talk when the inevitable “stuff” happens, take smaller bits of time for weeding every day, etc. etc.).
If you write these down and check in with them at the beginning of each month, my hope is that this will lead to a more focussed and productive growing season for you. I am going to do this myself today.
As I teach in your course, “Growing Self-Sufficiency: The Whole Picture,” there is a lot more to self-sufficiency than growing your own food. Focussing on what seem like small things (how we approach life’s inevitable “disasters”) can have a big impact on how our body-mind-spirit functions and is there for us in difficult times. This is what I have learned; this is how I live my life, and it is my gift to you.
Wishing you a wonderful beginning to your spring, a season of new life and hope!
Kind regards,
Colette
